Book Covers Using paint.net
Please Note: I include links to various sites that I reference. These are there just to help you if you're interested. At the time of writing these links were safe and working.
The general consensus from published indie authors is that you get someone else to design your book cover. Speaking for myself, I'm not there yet, I haven't really published my first real book yet. So you could be unkind and say that it's just a hobby, or you could just realise that this is a project that I'm doing on a shoestring. So getting a designer to do my cover may be a smart move but to get it done right would not come cheap.
What follows is not an exhaustive list of cover design tools, more an idea of what's possible and available to us lesser mortals. So let me talk about the DIY options that I have looked at. Bear in mind I'm not an expert at licensing, copyright or even graphics packages. I bring some experience to the table as a user of Serif Page Plus (no longer active) for about thirty years and more recently I moved over to Microsoft Publisher.
I started looking at Canva because a few people have recommended it. The access to images is good and the tools to bring together images and text were pretty good and not hard to use. When I looked into it the licensing of work created on Canva was OK-ish but not great.
I found Kittl. Kittl has drawing tools that work well too, not exactly the same as Canva but not hard to learn. There's a lot of video tutorial support for both Kittl and Canva. Kittl was a better licensing deal (in my non-expert opinion) and you can take time to learn the system on the free level as long as you pay for use when you export a final work. I found it quite nice, but the cover I came up with used an image that I uploaded and then used Kittl to bring it together with text. I wasn't really using the AI from Kittl, or some of it's best tools.
I stood back and realised that for production standard output I would be using Kittl for something that I could do in a desktop graphics program.
For a lot of simple graphics jobs I use paint.net. For more complex stuff I use Gimp. I have to admit that I find gimp is a real top end tool, but paint.net easier on my brain. It has a simple layered model and pretty standard graphics abilities along with some excellent plugins. I'll describe the process just in case you think it would be a bit of a pain in the posterior, when it was actually not that bad.
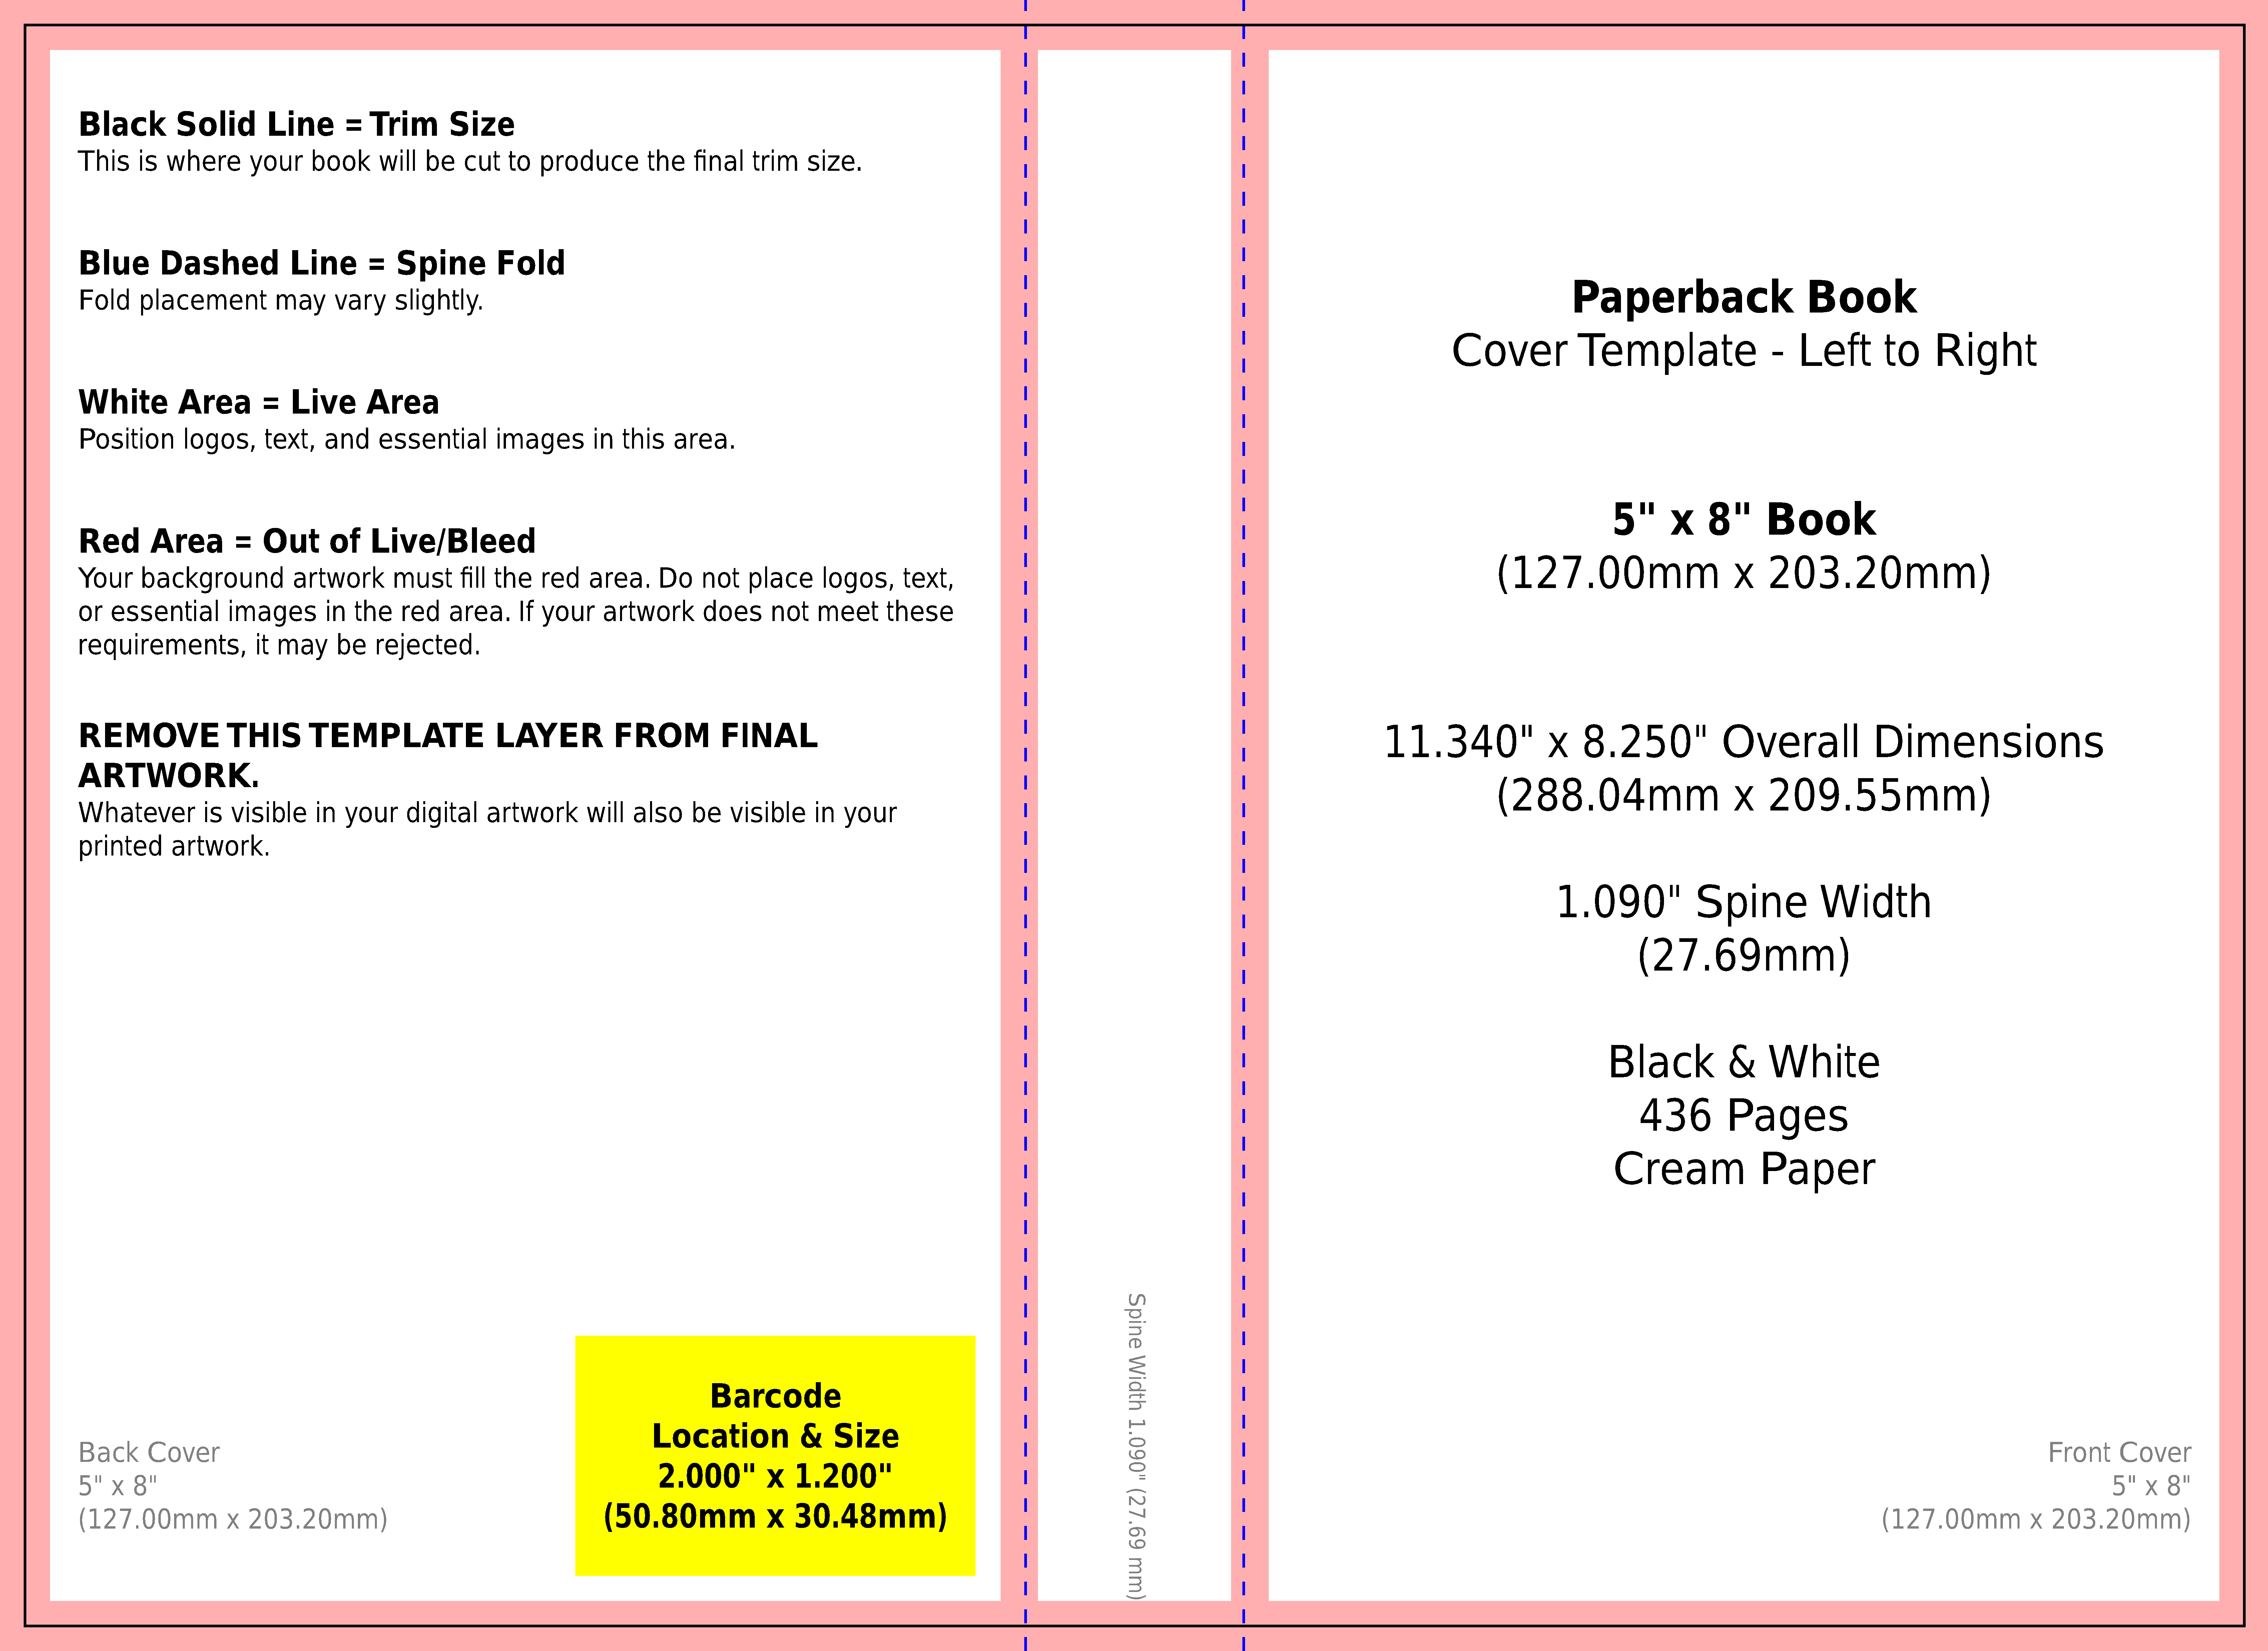
I started with the KDP cover calculator tool that calculates the size of your cover based on the number of pages, the size of book you want to print and a few other variables. The screen explains a lot of the technical terms like bleed area, cropping zone. The really useful part is that it generates a download that includes a png file that has everything shown there graphically. This is the file that I used as the base layer of my book template. It was intended for a huge 600dpi (dots per inch) printout.
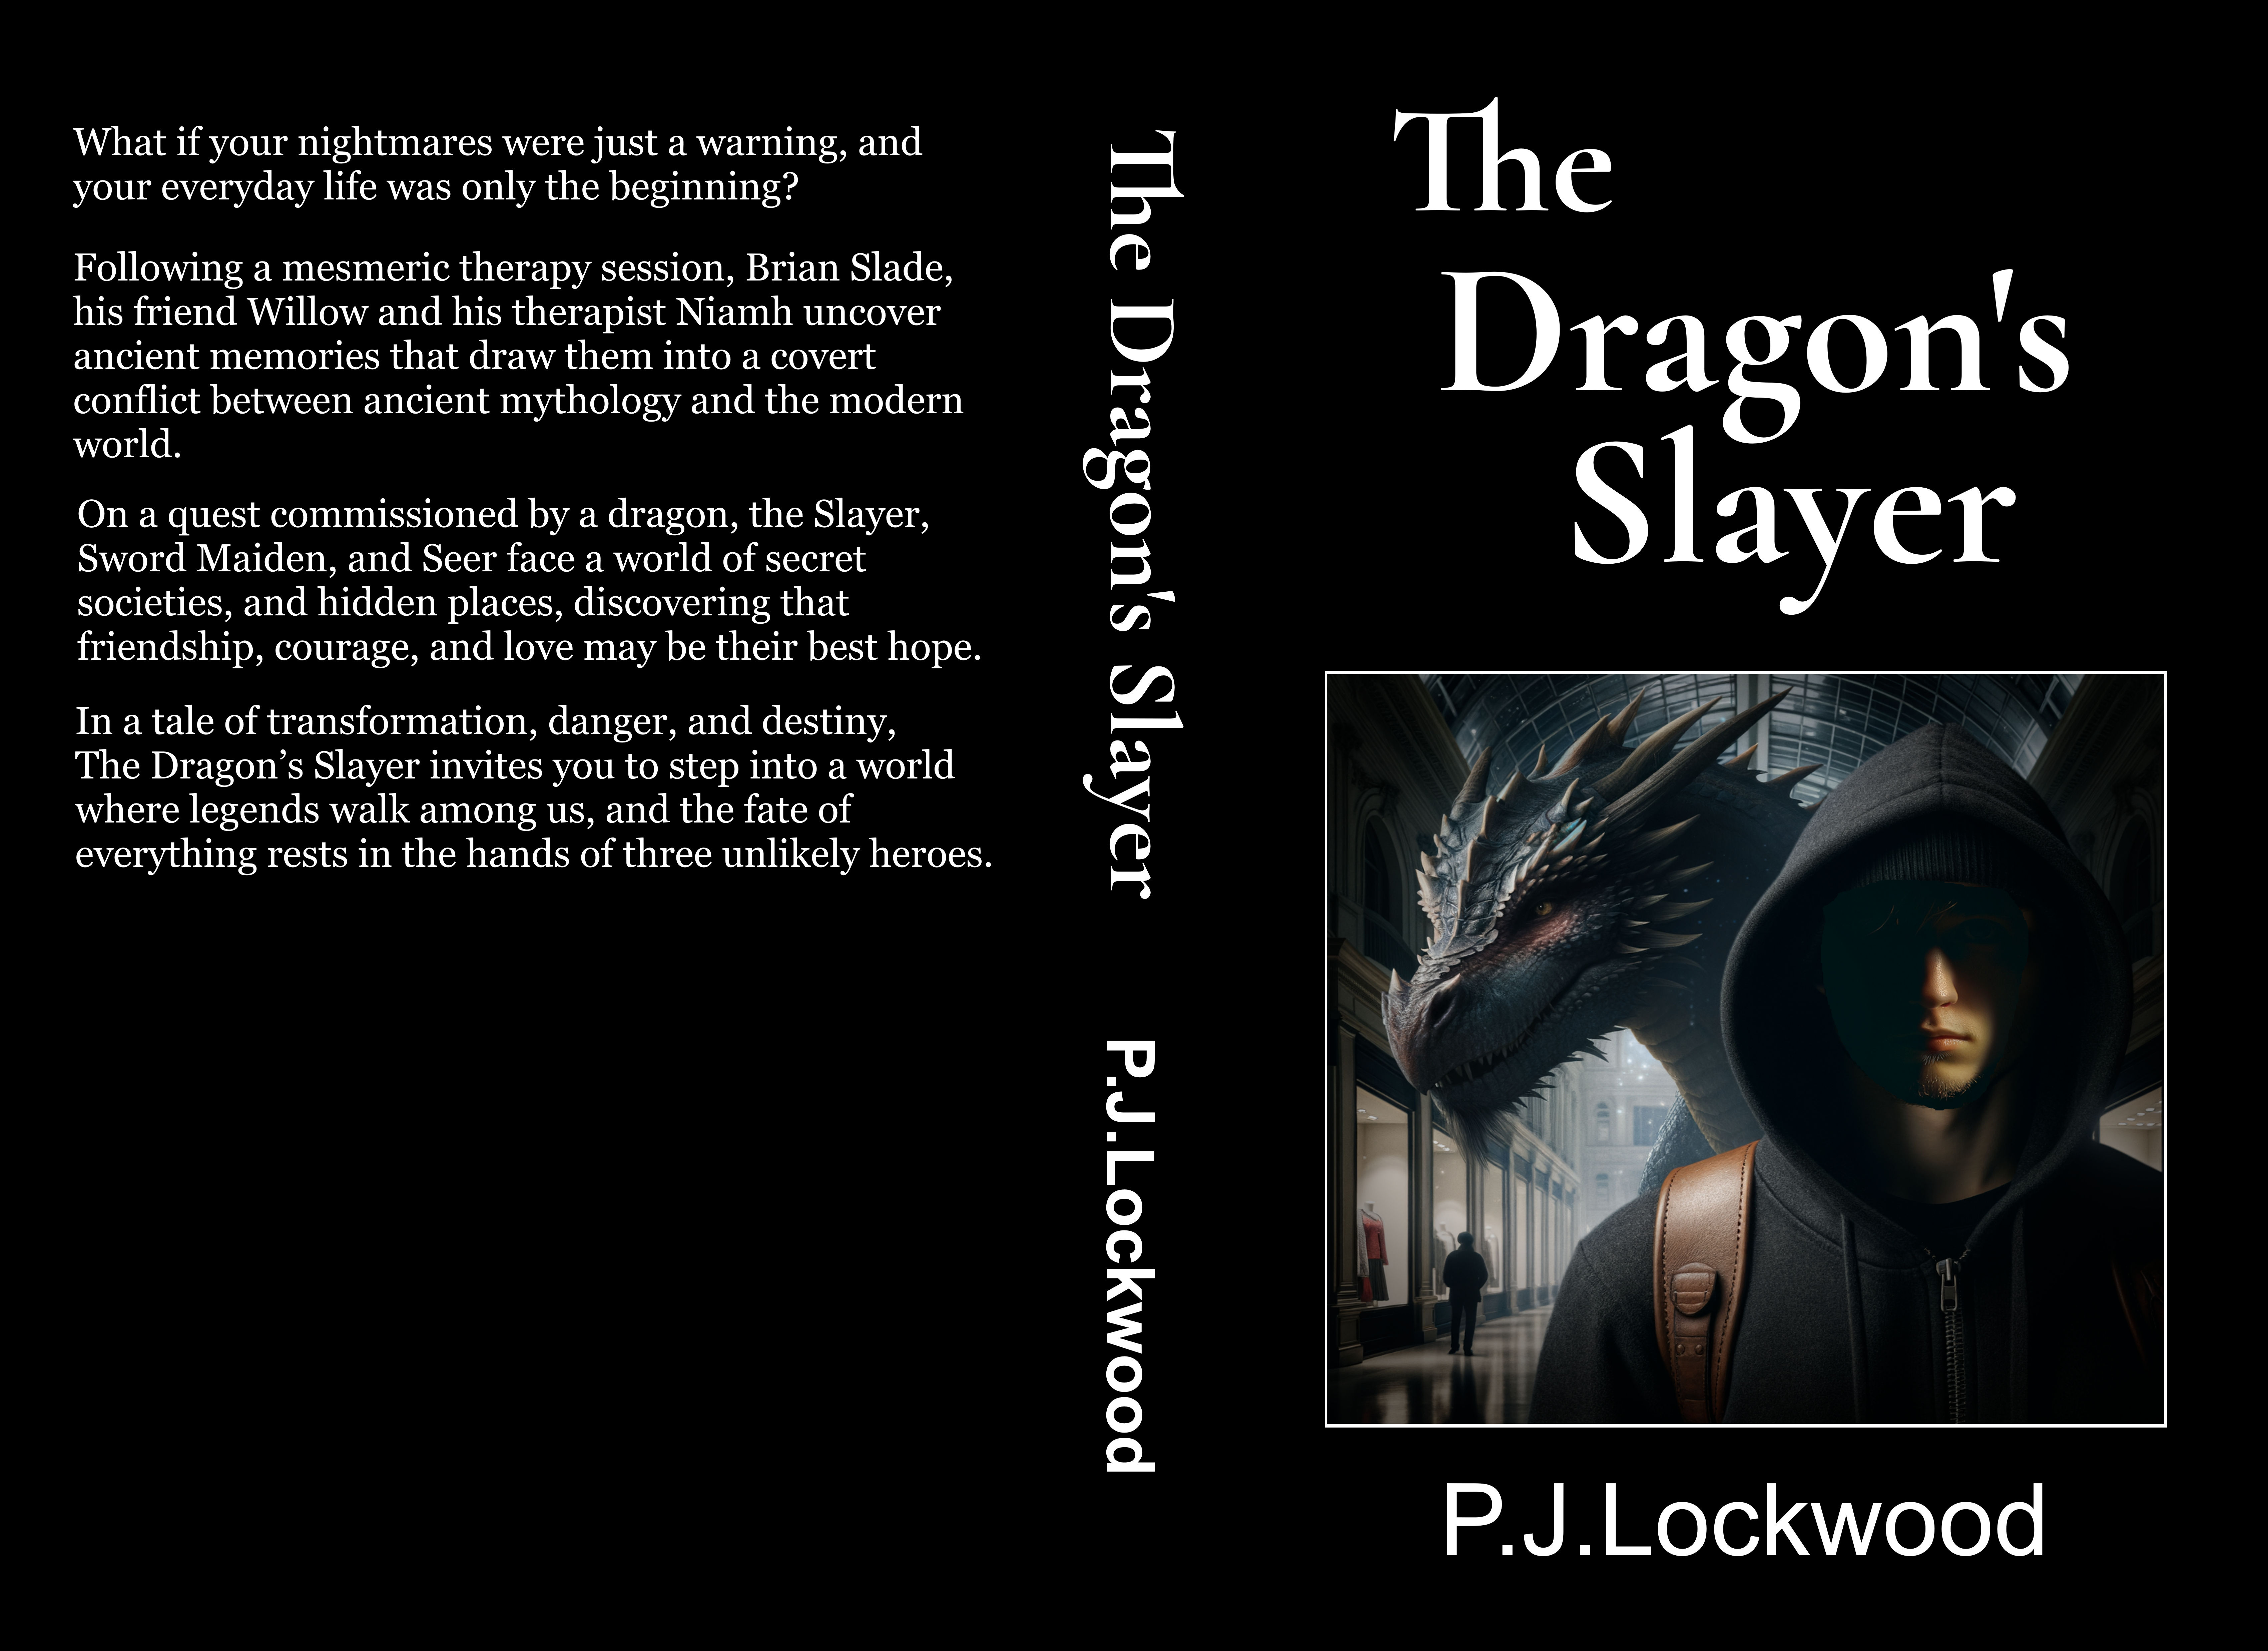
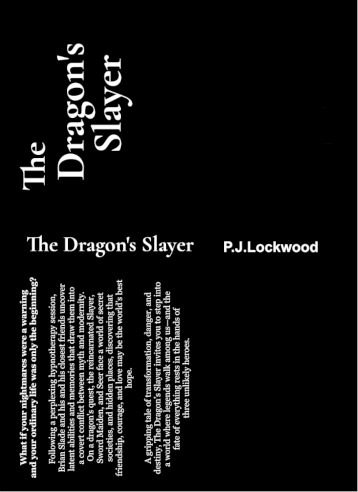
As you will come to see, my cover layout is simple, it has an image on the front cover, a black background and text in white. The image was generated using Microsoft paint AI and it came out as a 1000x1000 pixel image. I thought this was OK at the time but when you put it in a cover that is such high resolution it comes in at about three and a half inches which is a bit small. So i needed to upscale. You can do that with a lot of online tools but I found a plugin for paint.net that did the upscaling quite nicely.
The plugin is called "xBRZ Upscaling PNG FileType Plugin". To use it I loaded in the image and then did a save as and changed the filetype to "xBRZ Upscale PNG writer" and it asked me how many times bigger I wanted it, you can go between 2 and 5, that's double the size to five times the size and it adds in the extra pixels to generate a pretty good image. So I now had an image that was 2000x2000 pixels which would give wiggle room on the cover art.
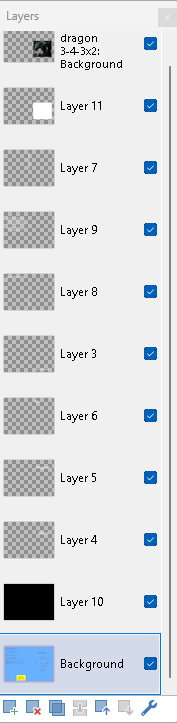
I loaded the image as a new layer in paint.net. You can drag layers around so that the items higher up the list appear in front of those below. So the aim of the exercise was to completely cover the template image.
Adding text is pretty straight forwards. There is a text tool, but it didn't have the font I needed. So I had to download a truetype font from google.com. There is a copy of the license alongside the "Get font" download link.
That sounds like a real mess-around but it was quite simple. I did a search for Cormorant Garamond (the font name) and it came up as a free font from Google.com. I downloaded it into windows, right clicked on the font file and selected install font from the drop down menu. It just worked.
For each chunk of text I used a separate layer. Adding text is easy, there's a text tool that allows you to type the text, select the font and the size and the colour and then you can move it to where you want it. To move a chunk of text, because you never get it right first time, you click on the layer, use the rectangle selecting tool to cut, the text area, then paste and position the text. Again it sounds like a pain but it's pretty simple when you've done it a couple of times.
To do the spine I had to rotate the full image by 90 degrees and add text. Then I rotated the image back to it's original orientation. Straight forward.
At all stages you can save a file in pdn format (paint dot net project format) which includes all your layers and everything. When you are ready you can save it as a png file and it will offer to flatten the layers, you need to do that because png and jpg files only support one layer. If you want to quickly return to the layered version you can reload your pdn file. You need to remember to manage your files.
That's about it. As I said, it sounds like a pain but it just takes a bit of practice, like the first time you looked up a word in the thesaurus of your word processor. The other thing to remember is that paint.net is free. If you use it, it would be nice to give a donation.
I checked on graphics that come from Microsoft paint. You can't claim copyright of the AI generated images but you are allowed to use them.
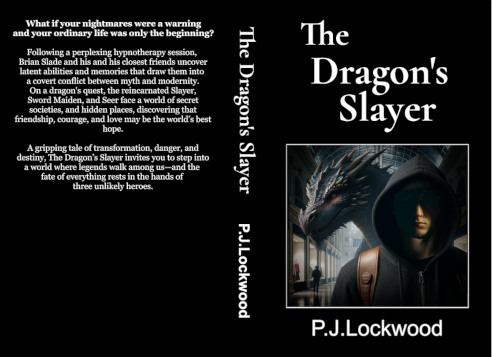
If you're wondering how I got the white border round the image. I used the select tool to mark an area slightly outside the image. Then I created another layer, and used the paint pot tool to create a white block. I positioned the white block below the image so yu can only see the outer part.
When you come to publishing on KDP they want this converting to a PDF file. I think you can do this using the GIMP image editor, but I used the online version at adobe.com. I don't like using online tools a lot, I like to keep things on my PC but when needs must I go for one that seems reputable. And it worked. The resulting cover was accepted by KDP.
I think it did a reasonable job. I know I'm not the best cover designer, but I'm not the worst either. I might have to replace my work in the future with a professional job, but that's part of the evolution process. You lives and you learns.
You should also read:
How To Make An Audio Book
The Short Version... Audio book: Really? To make an audio book you have to do a few things: I will provide a list of external references here, it represents pretty much the best that I've found on a budget so far. The microphone. There are…
Continue reading...
Copyright Your Book
A Brief History Of Copyright I've being doing a trawl about copyrighting a book. Anyone who's not newbie like me is probably well up to speed but I'm writing about it for my own sake. Co-pilot was my first port of call. It seems that…
Continue reading...